이미지의 기하학적 변형
Goal
기하학적 변형에 대해서 알 수 있다.
cv2.getPerspectiveTransform()함수에 대해서 알 수 있다.
Transformations
변환이란 수학적으로 표현하면 아래와 같습니다.
좌표 x를 좌표 x’로 변환하는 함수
예로는 사이즈 변경(Scaling), 위치변경(Translation), 회전(Rotaion) 등이 있습니다. 변환의 종류에는 몇가지 분류가 있습니다.
강체변환(Ridid-Body) : 크기 및 각도가 보존(ex; Translation, Rotation)
유사변환(Similarity) : 크기는 변하고 각도는 보존(ex; Scaling)
선형변환(Linear) : Vector 공간에서의 이동. 이동변환은 제외.
Affine : 선형변환과 이동변환까지 포함. 선의 수평성은 유지.(ex;사각형->평행사변형)
Perspective : Affine변환에 수평성도 유지되지 않음. 원근변환
Scaling
Scaling은 이미지의 사이즈가 변하는 것 입니다. OpenCV에서는 cv2.resize() 함수를 사용하여 적용할 수 있습니다.
사이즈가 변하면 pixel사이의 값을 결정을 해야 하는데, 이때 사용하는 것을 보간법(Interpolation method) 입니다.
많이 사용되는 보간법은 사이즈를 줄일 때는 cv2.INTER_AREA , 사이즈를 크게할 때는 cv2.INTER_CUBIC , cv2.INTER_LINEAR
을 사용합니다.
- cv2.resize(img, dsize, fx, fy, interpolation)
- Parameters
img – Image
dsize – Manual Size. 가로, 세로 형태의 tuple(ex; (100,200))
fx – 가로 사이즈의 배수. 2배로 크게하려면 2. 반으로 줄이려면 0.5
fy – 세로 사이즈의 배수
interpolation – 보간법
Sample Code
 1#-*- coding:utf-8 -*-
 2import cv2
 3import numpy as np
 4
 5img = cv2.imread('images/logo.png')
 6
 7# 행 : Height, 열:width
 8height, width = img.shape[:2]
 9
10# 이미지 축소
11shrink = cv2.resize(img, None, fx=0.5, fy=0.5, interpolation=cv2.INTER_AREA)
12
13# Manual Size지정
14zoom1 = cv2.resize(img, (width*2, height*2), interpolation=cv2.INTER_CUBIC)
15
16# 배수 Size지정
17zoom2 = cv2.resize(img, None, fx=2, fy=2, interpolation=cv2.INTER_CUBIC)
18
19
20cv2.imshow('Origianl', img)
21cv2.imshow('Shrink', shrink)
22cv2.imshow('Zoom1', zoom1)
23cv2.imshow('Zoom2', zoom2)
24
25cv2.waitKey(0)
26cv2.destroyAllWindows()
Result

Original

Shrink

Zoom
Translation
Translation은 이미지의 위치를 변경하는 변환입니다.
- cv2.warpAffine(src, M, dsize)
- Parameters
src – Image
M – 변환 행렬
dsize (tuple) – output image size(ex; (width=columns, height=rows)
Warning
width은 column의 수 이고, height는 row의 수 입니다.
여기서 변환행렬은 2X3의 이차원 행렬입니다. [[1,0,x축이동],[0,1,y축이동]] 형태의 float32 type의 numpy array입니다.
Sample Code
 1#-*- coding:utf-8 -*-
 2import cv2
 3import numpy as np
 4
 5img = cv2.imread('images/logo.png')
 6
 7rows, cols = img.shape[:2]
 8
 9# 변환 행렬, X축으로 10, Y축으로 20 이동
10M = np.float32([[1,0,10],[0,1,20]])
11
12dst = cv2.warpAffine(img, M,(cols, rows))
13cv2.imshow('Original', img)
14cv2.imshow('Translation', dst)
15
16cv2.waitKey(0)
17cv2.destroyAllWindows()
Result

Result
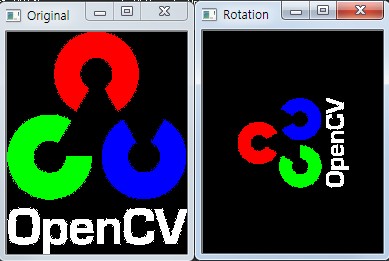
Rotation
물체를 평면상의 한 점을 중심으로 𝜃 만큼 회전하는 변환 입니다. 양의 각도는 시계반대방향으로 회전을 합니다.
역시 변환 행렬이 필요한데, 변환 행렬을 생성하는 함수가 cv2.getRotationMatrix2D() 함수입니다.
- cv2.getRotationMatrix2D(center, angle, scale) M
- Parameters
center – 이미지의 중심 좌표
angle – 회전 각도
scale – scale factor
위 결과에서 나온 변환행렬을 cv2.warpAffine() 함수에 적용합니다.
Sample Code
 1#-*- coding:utf-8 -*-
 2import cv2
 3
 4img = cv2.imread('images/logo.png')
 5
 6rows, cols = img.shape[:2]
 7
 8# 이미지의 중심점을 기준으로 90도 회전 하면서 0.5배 Scale
 9M= cv2.getRotationMatrix2D((cols/2, rows/2),90, 0.5)
10
11dst = cv2.warpAffine(img, M,(cols, rows))
12
13cv2.imshow('Original', img)
14cv2.imshow('Rotation', dst)
15
16cv2.waitKey(0)
17cv2.destroyAllWindows()
Result
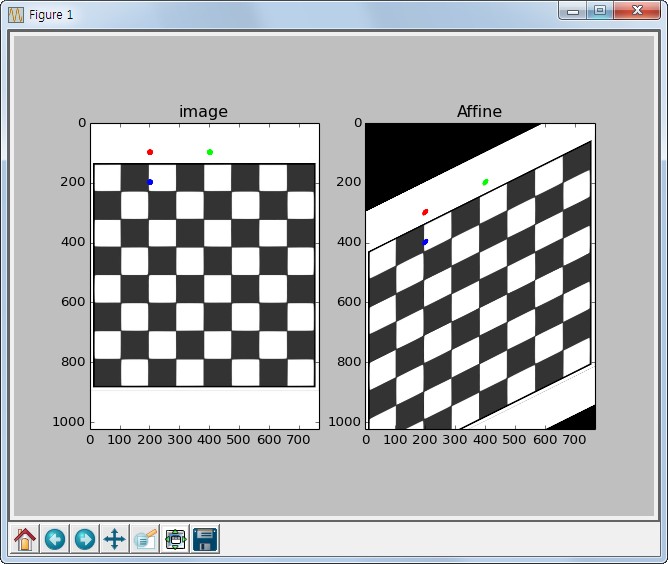
Affine Transformation
Affine Transformation은 선의 평행성은 유지가 되면서 이미지를 변환하는 작업입니다. 이동, 확대, Scale, 반전까지 포함된 변환입니다. Affine 변환을 위해서는 3개의 Match가 되는 점이 있으면 변환행렬을 구할 수 있습니다.
Sample Code
 1#-*- coding:utf-8 -*-
 2import cv2
 3import numpy as np
 4from matplotlib import pyplot as plt
 5
 6img = cv2.imread('images/chessboard.jpg')
 7rows, cols, ch = img.shape
 8
 9pts1 = np.float32([[200,100],[400,100],[200,200]])
10pts2 = np.float32([[200,300],[400,200],[200,400]])
11
12# pts1의 좌표에 표시. Affine 변환 후 이동 점 확인.
13cv2.circle(img, (200,100), 10, (255,0,0),-1)
14cv2.circle(img, (400,100), 10, (0,255,0),-1)
15cv2.circle(img, (200,200), 10, (0,0,255),-1)
16
17M = cv2.getAffineTransform(pts1, pts2)
18
19dst = cv2.warpAffine(img, M, (cols,rows))
20
21plt.subplot(121),plt.imshow(img),plt.title('image')
22plt.subplot(122),plt.imshow(dst),plt.title('Affine')
23plt.show()
Result
Perspective Transformation
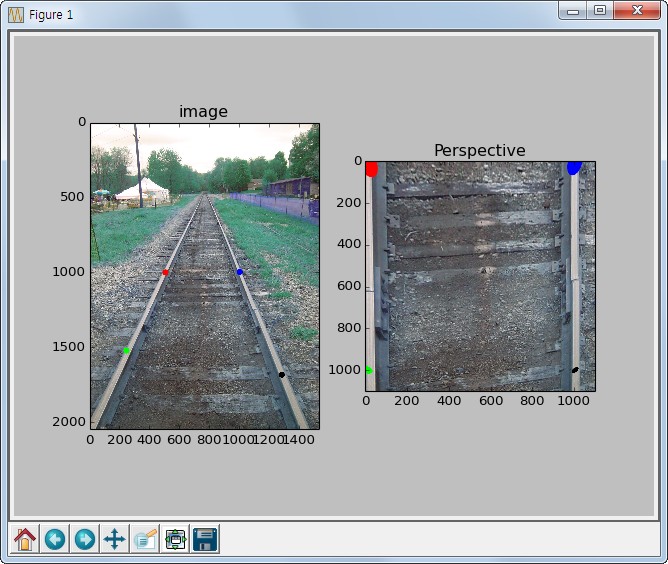
Perspective(원근법) 변환은 직선의 성질만 유지가 되고, 선의 평행성은 유지가 되지 않는 변환입니다. 기차길은 서로 평행하지만 원근변환을 거치면 평행성은 유지 되지 못하고 하나의 점에서 만나는 것 처럼 보입니다.(반대의 변환도 가능)
4개의 Point의 Input값과이동할 output Point 가 필요합니다.
변환 행렬을 구하기 위해서는 cv2.getPerspectiveTransform() 함수가 필요하며, cv2.warpPerspective() 함수에 변환행렬값을 적용하여
최종 결과 이미지를 얻을 수 있습니다.
아래의 예는 원근법이 적용된 효과를 제거하는 예제입니다.
Sample Code
 1#-*- coding:utf-8 -*-
 2import cv2
 3import numpy as np
 4from matplotlib import pyplot as plt
 5
 6img = cv2.imread('images/perspective.jpg')
 7# [x,y] 좌표점을 4x2의 행렬로 작성
 8# 좌표점은 좌상->좌하->우상->우하
 9pts1 = np.float32([[504,1003],[243,1525],[1000,1000],[1280,1685]])
10
11# 좌표의 이동점
12pts2 = np.float32([[10,10],[10,1000],[1000,10],[1000,1000]])
13
14# pts1의 좌표에 표시. perspective 변환 후 이동 점 확인.
15cv2.circle(img, (504,1003), 20, (255,0,0),-1)
16cv2.circle(img, (243,1524), 20, (0,255,0),-1)
17cv2.circle(img, (1000,1000), 20, (0,0,255),-1)
18cv2.circle(img, (1280,1685), 20, (0,0,0),-1)
19
20M = cv2.getPerspectiveTransform(pts1, pts2)
21
22dst = cv2.warpPerspective(img, M, (1100,1100))
23
24plt.subplot(121),plt.imshow(img),plt.title('image')
25plt.subplot(122),plt.imshow(dst),plt.title('Perspective')
26plt.show()
Result