도형 그리기
Goal
다양한 모양의 도형을 그릴 수 있다.
cv2.line(),cv2.circle(),cv2.rectangle(),cv2.putText()사용법을 알 수 있다.
도형그리기는 동영상이나 이미지에서 Match가 되는 영역을 찾은 후에 사용자가 인식하기 쉽게 표시하는 목적으로 사용됩니다.
Line 그리기
Start와 End 점을 연결하여 직선을 그립니다.
- cv2.line(img, start, end, color, thickness)
- Parameters
img – 그림을 그릴 이미지 파일
start – 시작 좌표(ex; (0,0))
end – 종료 좌표(ex; (500. 500))
color – BGR형태의 Color(ex; (255, 0, 0) -> Blue)
thickness (int) – 선의 두께. pixel
Sample Code
 1import numpy as np
 2import cv2
 3
 4#모두 0으로 되어 있는 빈 Canvas(검정색)
 5img = np.zeros((512, 512, 3), np.uint8)
 6img = cv2.line(img, (0, 0), (511, 511), (255, 0, 0), 5)
 7
 8cv2.imshow('image',img)
 9cv2.waitKey(0)
10cv2.destroyAllWindows()
사각형 그리기
top-left corner와 bottom-right corner점을 연결하는 사각형을 그립니다.
- cv2.rectangle(img, start, end, color, thickness)
- Parameters
img – 그림을 그릴 이미지
start – 시작 좌표(ex; (0,0))
end – 종료 좌표(ex; (500. 500))
color – BGR형태의 Color(ex; (255, 0, 0) -> Blue)
thickness (int) – 선의 두께. pixel
Sample Code
img = cv2.rectangle(img, (384, 0), (510, 128), (0,255,0), 3)
원 그리기
- cv2.circle(img, center, radian, color, thickness)
- Parameters
img – 그림을 그릴 이미지
center – 원의 중심 좌표(x, y)
radian – 반지름
color – BGR형태의 Color
thickness – 선의 두께, -1 이면 원 안쪽을 채움
Sample Code
img = cv2.circle(img, (447,63), 63, (0,0,255), -1)
타원 그리기
- cv2.ellipse(img, center, axes, angle, startAngle, endAngle, color[, thickness[, lineType[, shift]]]) → img
- Parameters
img – image
center – 타원의 중심
axes – 중심에서 가장 큰 거리와 작은 거리
angle – 타원의 기울기 각
startAngle – 타원의 시작 각도
endAngle – 타원이 끝나는 각도
color – 타원의 색
thickness – 선 두께 -1이면 안쪽을 채움
Sample Code
img = cv2.ellipse(img, (256,256), (100,50), 0, 0, 180, 255, -1)
Polygon 그리기
- cv2.polylines(img, pts, isClosed, color, thickness)
- Parameters
img – image
pts (array) – 연결할 꼭지점 좌표
isClosed – 닫흰 도형 여부
color – Color
thickness – 선 두께
Sample Code
pts = np.array([[10,5], [20,30], [70,20], [50,10]], np.int32) # 각 꼭지점은 2차원 행렬로 선언
# 이미지에 표현하기 위해 3차원 행렬로 변환. 변환이전과 이후의 행렬 갯수는 동일해야함.
# -1은 원본에 해당하는 값을 그대로 유지.
pts = pts.reshape((-1, 1, 2))
img = cv2.polylines(img, [pts], True, (0,255,255))
이미지에 Text 추가
- cv2.putText(img, text, org, font, fontSacle, color)
- Parameters
img – image
text – 표시할 문자열
org – 문자열이 표시될 위치. 문자열의 bottom-left corner점
font – font type. CV2.FONT_XXX
fontSacle – Font Size
color – fond color
Sample Code
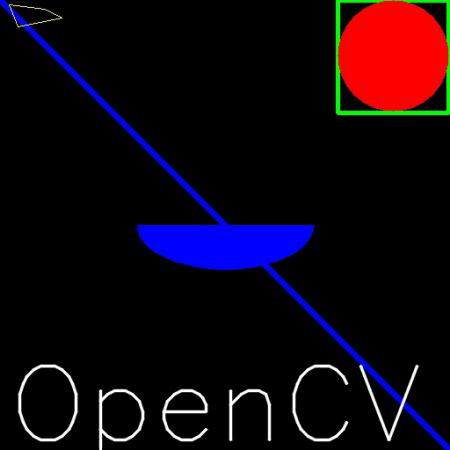
cv2.putText(img, 'OpenCV', (10,500), cv2.FONT_HERSHEY_SIMPLEX, 4, (255,255,255), 2)
지금까지 예제로 보여 주웠던 Sample Code를 실행시키면 아래와 같은 결과가 나옵니다.